Elasticsearch와 Kibana(단일 노드) 설치 및 통합 방법
테스트 환경
$ cat /etc/os-release
NAME="Amazon Linux"
VERSION="2"
ID="amzn"
ID_LIKE="centos rhel fedora"
VERSION_ID="2"
PRETTY_NAME="Amazon Linux 2"
ANSI_COLOR="0;33"
CPE_NAME="cpe:2.3:o:amazon:amazon_linux:2"
HOME_URL="https://amazonlinux.com/"
Elasticsearch 설치
Elasticsearch 다운로드 페이지
- https://www.elastic.co/downloads/elasticsearch
- https://www.elastic.co/guide/en/elasticsearch/reference/8.6/rpm.html#rpm-repo
Elasticsearch 리포지토리
vim /etc/yum.repos.d/elasticsearch.repo(elasticsearch)
name=Elasticsearch repository for 8.x packages
baseurl=https://artifacts.elastic.co/packages/8.x/yum
gpgcheck=1
gpgkey=https://artifacts.elastic.co/GPG-KEY-elasticsearch
enabled=0
autorefresh=1
type=rpm-mdElasticsearch 패키지 설치
yum install --enablerepo=elasticsearch -y elasticsearch--------------------------- Security autoconfiguration information ------------------------------
Authentication and authorization are enabled.
TLS for the transport and HTTP layers is enabled and configured.
The generated password for the elastic built-in superuser is : p4jNvNrbxThupVUnN=Xv
If this node should join an existing cluster, you can reconfigure this with
'/usr/share/elasticsearch/bin/elasticsearch-reconfigure-node --enrollment-token <token-here>'
after creating an enrollment token on your existing cluster.
You can complete the following actions at any time:
Reset the password of the elastic built-in superuser with
'/usr/share/elasticsearch/bin/elasticsearch-reset-password -u elastic'.
Generate an enrollment token for Kibana instances with
'/usr/share/elasticsearch/bin/elasticsearch-create-enrollment-token -s kibana'.
Generate an enrollment token for Elasticsearch nodes with
'/usr/share/elasticsearch/bin/elasticsearch-create-enrollment-token -s node'.
-------------------------------------------------------------------------------------------------
### NOT starting on installation, please execute the following statements to configure
elasticsearch service to start automatically using systemd
sudo systemctl daemon-reload
sudo systemctl enable elasticsearch.service
### You can start elasticsearch service by executing
sudo systemctl start elasticsearch.serviceElasticsearch 설정(elasticsearch.yml)을 확인합니다.
cat /etc/elasticsearch/elasticsearch.yml | egrep -v '^$|^#'$ cat /etc/elasticsearch/elasticsearch.yml | egrep -v '^$|^#'
path.data: /var/lib/elasticsearch
path.logs: /var/log/elasticsearch
xpack.security.enabled: true
xpack.security.enrollment.enabled: true
xpack.security.http.ssl:
enabled: true
keystore.path: certs/http.p12
xpack.security.transport.ssl:
enabled: true
verification_mode: certificate
keystore.path: certs/transport.p12
truststore.path: certs/transport.p12
cluster.initial_master_nodes: ("elasticsearch")
http.host: 0.0.0.0Elasticsearch 서비스 시작(실행)
systemctl --now enable elasticsearch.serviceElasticsearch 서비스의 상태 확인
systemctl status elasticsearch.servicejournalctl -xe(실수)
systemd-entrypoint(23634): /usr/share/elasticsearch/bin/systemd-entrypoint: 7행: /etc/elasticsearch/my_pwd_file.tmp: 해당 파일 또는 디렉터리 없음
Elasticsearch 키 저장소 비밀번호
echo "1234" > /etc/elasticsearch/my_pwd_file.tmpElasticsearch 서비스 다시 시작(실행)
systemctl restart elasticsearch.serviceElasticsearch 정보 확인
curl -k -XGET 'https://elastic:p4jNvNrbxThupVUnN=Xv@localhost:9200'$ curl -k -XGET 'https://elastic:p4jNvNrbxThupVUnN=Xv@localhost:9200'
{
"name" : "elasticsearch",
"cluster_name" : "elasticsearch",
"cluster_uuid" : "Q8dHPJaaS_SHikGLC-hEmQ",
"version" : {
"number" : "8.6.2",
"build_flavor" : "default",
"build_type" : "rpm",
"build_hash" : "2d58d0f136141f03239816a4e360a8d17b6d8f29",
"build_date" : "2023-02-13T09:35:20.314882762Z",
"build_snapshot" : false,
"lucene_version" : "9.4.2",
"minimum_wire_compatibility_version" : "7.17.0",
"minimum_index_compatibility_version" : "7.0.0"
},
"tagline" : "You Know, for Search"
}탄력적 계정 암호 재설정
/usr/share/elasticsearch/bin/elasticsearch-reset-password -u elastic -i$ /usr/share/elasticsearch/bin/elasticsearch-reset-password -u elastic -i
This tool will reset the password of the (elastic) user.
You will be prompted to enter the password.
Please confirm that you would like to continue (y/N)y
Enter password for (elastic):
Re-enter password for (elastic):
Password for the (elastic) user successfully reset.kibana_system 계정 비밀번호 재설정
/usr/share/elasticsearch/bin/elasticsearch-reset-password -u kibana_system -iElasticsearch 정보 확인
curl --cacert /etc/elasticsearch/certs/http_ca.crt -u elastic https://localhost:9200$ curl --cacert /etc/elasticsearch/certs/http_ca.crt -u elastic https://localhost:9200
Enter host password for user 'elastic':
{
"name" : "elasticsearch",
"cluster_name" : "elasticsearch",
"cluster_uuid" : "Q8dHPJaaS_SHikGLC-hEmQ",
"version" : {
"number" : "8.6.2",
"build_flavor" : "default",
"build_type" : "rpm",
"build_hash" : "2d58d0f136141f03239816a4e360a8d17b6d8f29",
"build_date" : "2023-02-13T09:35:20.314882762Z",
"build_snapshot" : false,
"lucene_version" : "9.4.2",
"minimum_wire_compatibility_version" : "7.17.0",
"minimum_index_compatibility_version" : "7.0.0"
},
"tagline" : "You Know, for Search"
}
키바나 설치
키바나 다운로드 페이지
- https://www.elastic.co/downloads/kibana
- https://www.elastic.co/guide/en/kibana/8.6/rpm.html#rpm-repo
키바나 패키지 설치
yum install --enablerepo=elasticsearch -y kibanaKibana 설정(kibana.yml)을 확인합니다.
cat /etc/kibana/kibana.yml.bk | egrep -v '^$|^#'$ cat /etc/kibana/kibana.yml.bk | egrep -v '^$|^#'
logging:
appenders:
file:
type: file
fileName: /var/log/kibana/kibana.log
layout:
type: json
root:
appenders:
- default
- file
pid.file: /run/kibana/kibana.pidkibana.yml 편집
- 서버.포트: 5601
- 서버.호스트: “0.0.0.0”
- server.publicBaseUrl: “http://서버-ip:5601”
vim /etc/kibana/kibana.yml# =================== System: Kibana Server ===================
# Kibana is served by a back end server. This setting specifies the port to use.
server.port: 5601
# Specifies the address to which the Kibana server will bind. IP addresses and host names are both valid values.
# The default is 'localhost', which usually means remote machines will not be able to connect.
# To allow connections from remote users, set this parameter to a non-loopback address.
server.host: "0.0.0.0"
# Enables you to specify a path to mount Kibana at if you are running behind a proxy.
# Use the `server.rewriteBasePath` setting to tell Kibana if it should remove the basePath
# from requests it receives, and to prevent a deprecation warning at startup.
# This setting cannot end in a slash.
#server.basePath: ""
# Specifies whether Kibana should rewrite requests that are prefixed with
# `server.basePath` or require that they are rewritten by your reverse proxy.
# Defaults to `false`.
#server.rewriteBasePath: false
# Specifies the public URL at which Kibana is available for end users. If
# `server.basePath` is configured this URL should end with the same basePath.
server.publicBaseUrl: "http://server-ip:5601"Kibana 서비스 시작(실행)
systemctl --now enable kibana.serviceKibana 서비스 상태 확인
- 시작하려면 http://0.0.0.0:5601/?code=683195로 이동하세요.
systemctl status kibana.service$ systemctl status kibana.service
● kibana.service - Kibana
Loaded: loaded (/usr/lib/systemd/system/kibana.service; enabled; vendor preset: disabled)
Active: active (running) since Thu 2023-03-16 23:29:01 KST; 22s ago
Docs: https://www.elastic.co
Main PID: 25050 (node)
CGroup: /system.slice/kibana.service
└─25050 /usr/share/kibana/bin/../node/bin/node /usr/share/kibana/bin/../src/cli/dist
Mar 16 23:29:20 elasticsearch kibana(25050): (2023-03-16T23:29:20.672+09:00)(INFO )(plugins-service) Plugin "cloudExperiments" is disabled.
Mar 16 23:29:20 elasticsearch kibana(25050): (2023-03-16T23:29:20.672+09:00)(INFO )(plugins-service) Plugin "cloudFullStory" is disabled.
Mar 16 23:29:20 elasticsearch kibana(25050): (2023-03-16T23:29:20.672+09:00)(INFO )(plugins-service) Plugin "cloudGainsight" is disabled.
Mar 16 23:29:20 elasticsearch kibana(25050): (2023-03-16T23:29:20.683+09:00)(INFO )(plugins-service) Plugin "profiling" is disabled.
Mar 16 23:29:20 elasticsearch kibana(25050): (2023-03-16T23:29:20.793+09:00)(INFO )(http.server.Preboot) http server running at http://0.0.0.0:5601
Mar 16 23:29:20 elasticsearch kibana(25050): (2023-03-16T23:29:20.885+09:00)(INFO )(plugins-system.preboot) Setting up (1) plugins: (interactiveSetup)
Mar 16 23:29:20 elasticsearch kibana(25050): (2023-03-16T23:29:20.889+09:00)(INFO )(preboot) "interactiveSetup" plugin is holding setup: Validating Elasticsearch co…onfiguration…
Mar 16 23:29:20 elasticsearch kibana(25050): (2023-03-16T23:29:20.943+09:00)(INFO )(root) Holding setup until preboot stage is completed.
Mar 16 23:29:20 elasticsearch kibana(25050): i Kibana has not been configured.
Mar 16 23:29:20 elasticsearch kibana(25050): Go to http://0.0.0.0:5601/?code=683195 to get started.
Hint: Some lines were ellipsized, use -l to show in full.
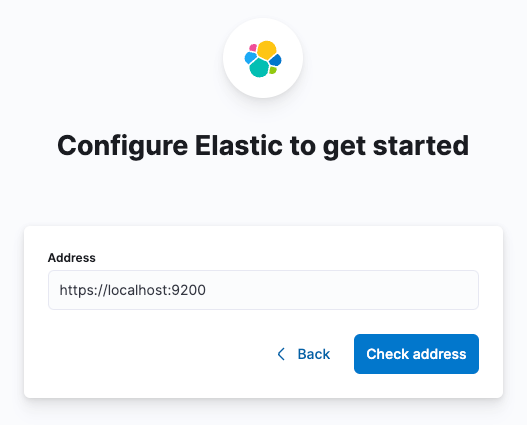
Kibana와 Elasticsearch 통합
- 브라우저(UI)에서 http://server-ip:5601에 접속합니다.

- 주소: https://localhost:9200
- 사용자 이름: kibana_system
- 비밀번호: kibana_system

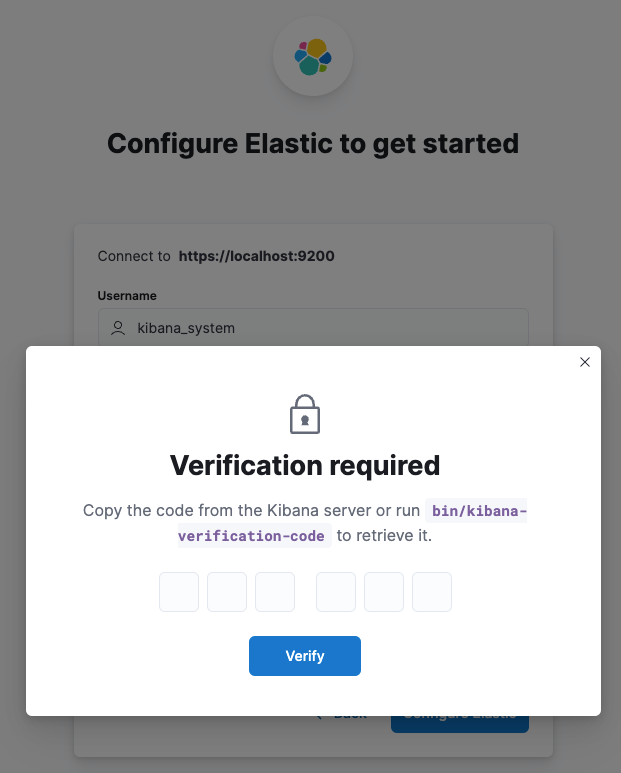
/usr/share/kibana/bin/kibana-verification-code$ /usr/share/kibana/bin/kibana-verification-code
Your verification code is: 683 195


Kibana 설정(kibana.yml)을 확인합니다.
– 브라우저를 통한 설정이 완료되면 다음 항목이 추가됩니다.
- 엘라스틱서치.호스트:
- Elasticsearch.사용자 이름:
- 탄력적 검색 암호:
- elasticsearch.ssl.certificate 권한:
- xpack.fleet.출력:
$ cat /etc/kibana/kibana.yml | egrep -v '^$|^#'
server.port: 5601
server.host: "0.0.0.0"
server.publicBaseUrl: "http://server-ip:5601"
logging:
  appenders:
    file:
      type: file
      fileName: /var/log/kibana/kibana.log
      layout:
        type: json
  root:
    appenders:
      - default
      - file
pid.file: /run/kibana/kibana.pid
elasticsearch.hosts: ('https://localhost:9200')
elasticsearch.username: kibana_system
elasticsearch.password: kibana_system
elasticsearch.ssl.certificateAuthorities: (/var/lib/kibana/ca_1678977426886.crt)
xpack.fleet.outputs: ({id: fleet-default-output, name: default, is_default: true, is_default_monitoring: true, type: elasticsearch, hosts: ('https://localhost:9200'), ca_trusted_fingerprint: aa68bed197c6921933227e49d5917576b31161fbbdaf5ad73616247a30b7aaaa})